So, you’ve decided to start using Microsoft Azure Table Storage.
Note that you can use any popular programming language with Azure table storage, not just the well-known .NET languages.
Behind the scenes, Azure table storage is just a REST/JSON API. That means, even though Azure is made by Microsoft, it doesn’t mean you have to use a Microsoft language, in order to use it. You use whatever you like. It’s all just 0’s and 1’s anyway.
Do yourself a favor, do some research on Azure’s product websites and find out what languages are supported on Azure, so you don’t switch to another language, based on the assumption that you are required to use a Microsoft language because you are using Microsoft Azure.
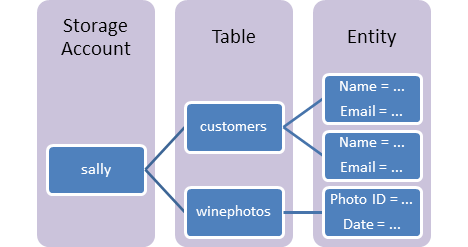
One more thing before the fun can begin. What are partition keys and row keys? Azure table storage uses both a partition key and a row key to identify any given row in any of your tables. They are columns that exist on every row, and you have no say in the matter, whether to add or remove them. You can safely trust and assume that they will be there, always. The partition key and row key, together, forms what I suppose you could call a table row’s “composite primary key”.
OK. To start the fun, you need an Azure account, and you need to have added a storage account (basically a database), on your Azure account (accounts, accounts, accounts!).
After you create the storage account, you would then get an account name and account key (my_account_name and my_account_key, used in the app.config/web.config below), which you will insert in your config file, to do stuff in your database.
Let’s just go with Visual Studio 2015/2017 and C#. You would create a project as usual (console, WPF, WCF, website, doesn’t matter) and do the following in the NuGet Package Manager Console:
Install-Package WindowsAzure.Storage
Install-Package Microsoft.WindowsAzure.ConfigurationManager
Install-Package System.ValueTuple
Then, to perform the classic CRUD (Create, Read, Update, Delete) operations on the database, do the following:
app.config or web.config:
<appSettings>
  <add key="MyStorageConnectionString" value="DefaultEndpointsProtocol=https;AccountName=<my_account_name>;AccountKey=<my_account_key>;EndpointSuffix=core.windows.net" /> </appSettings>
You can change “MyStorageConnectionString” to whatever you want.
Create an entity class to represent a row of data stored in the database:
public class MyEntity : TableEntity
{
    public string Name { get; set; }
    public int Age { get; set; }
    public MyEntity(string partitionKey, string rowKey)
    {
        PartitionKey = partitionKey;
        RowKey = rowKey;
    }
}
Create a helper method to create a table in the database.
protected CloudTable GetTable(string tableName)
{
    // Name of connection string in web.config
    var connectionString = "MyStorageConnectionString";

    // Parse the connection string and return a reference to the storage account.
    var storageAccount = CloudStorageAccount.Parse(CloudConfigurationManager.GetSetting(connectionString));

    // Create the table client
    var tableClient = storageAccount.CreateCloudTableClient();

    // Retrieve a reference to the table
    var table = tableClient.GetTableReference(tableName);

    // Create the table if it doesn't exist
    table.CreateIfNotExists();

    return table;
}
Easy enough. The following statement creates a table in the database.
var table = GetTable("tableName");
You won’t normally use the above table object itself directly, it’s used by the methods below. To insert, select, update and delete rows to/from a table, you need the table’s object. So, on its own the table object isn’t useful, but it is needed in order to do the CRUD things, which are quite useful.
To insert a row in the table:
public async Task InsertAsync(MyEntity row)
{
    var table = GetTable("tableName");
    var insertOperation = TableOperation.Insert(row);
    await table.ExecuteAsync(insertOperation);
}
Easy enough. The following statement will insert a new row into the table:
var row = new MyEntity("", "user1");
await InsertAsync(row);
To read a row from the table (this is where the code starts looking confusing and difficult, but it’s not so bad, it just looks that way):
using WhereComparison = ValueTuple<string, string, string>;
public async Task<IEnumerable<MyEntity>> SelectAsync(params WhereComparison[] criteria)
{
    return await new TaskFactory().StartNew(() => GetTable("tableName").ExecuteQuery(CreateQuery<MyEntity>(criteria)));
}
private static TableQuery<MyEntity> CreateQuery(params (string key, string compareOperation, string value)[] criteria)
{
    // Construct the query operation for all entities where criteria is met
    var query = new TableQuery<MyEntity>();
    if (criteria != null)
    {
        string whereClause = null;
        foreach (var comparison in criteria)
        {
            var current = TableQuery.GenerateFilterCondition(comparison.key, comparison.compareOperation, comparison.value);
            if (whereClause == null)
                whereClause = current;
            else
                TableQuery.CombineFilters(whereClause, TableOperators.And, current);
        }
        query.Where(whereClause);
    }
    return query;
}
Easy enough. The following statement will select rows from the database, using the methods created above:
var rows = await SelectAsync(("RowKey", QueryComparisons.Equal, "123"));
To update a row in the table:
public async Task UpdateAsync(MyEntity row)
{
    var table = GetTable("tableName");
    var updateOperation = TableOperation.Replace(row);
    await table.ExecuteAsync(updateOperation);
}
Easy enough. Use the following code to update a row in the database:
var row = new MyEntity("", "user1");
row.Name = "John";
await UpdateAsync(row);
To delete a row from the table:
public async Task DeleteAsync(MyEntity row)
{
    var deleteOperation = TableOperation.Delete(row);
    await GetTable("tableName").ExecuteAsync(deleteOperation);
}
Easy enough. Use the following code to delete a row from the database:
var row = new MyEntity("", "user1");
await DeleteAsync(row);